
Welcome to my world
Howard's Trip #1 - August, 2009
In February, 2009 I wrote in Roadstory News # 12, "I suppose the
nature of this newsletter will now morph into something different as
we spend more time at home." Since we're now off-the-road more
than on, that time has come. So I've changed the name to
'Howard's Trip' and will write more about my activities other than
RV travel. Right now, I'm spending a lot of time in my
woodworking shop. See my 'Essays and Files' section for my
travel letter archives.
I've been handy all of my life, and even built a house in the
70's but most of my work until recently has been more of a carpentry
and handyman nature than what you might call fine woodworking.
When we
 bought our house in January, 2008 and parked the Airstream
in the yard, I started accumulating what I consider the essential
tools of home ownership. The space I have available for a shop
is a walled off section of our garage, but by putting the big things
on rollers, I can still accomplish quite a lot in my 11 X 24 foot
space.
bought our house in January, 2008 and parked the Airstream
in the yard, I started accumulating what I consider the essential
tools of home ownership. The space I have available for a shop
is a walled off section of our garage, but by putting the big things
on rollers, I can still accomplish quite a lot in my 11 X 24 foot
space.
I'd really like to design and build fine furniture. And
maybe I eventually will. But hardwood is very expensive, my
tools are as limited as my space, and I have not yet mastered the
necessary skills. So for now, I'm building nice boxes. I
think of boxes as miniature furniture anyway and I can labor
intensively on a project with a minimal commitment of materials.
The more I do, the more I learn. And I start a new project
often enough to keep from getting bored. Maybe I will even sell some
boxes and make a little money to support my hobby. But the
main reason I'm doing this, is that I just love this kind of work. I
get into a kind of 'flow' in my shop much like I have experienced
drawing and painting, playing blues harmonica, rock climbing,
writing, and playing chess, where I momentarily lose my sense of
time and self. Marilyn says that I'm at my happiest when I'm
solving a woodworking problem. I think she may be right.
So I've started out with some projects from a box making book by
Doug Stowe and have progressed to my own designs, some with unique
solutions to common problems. I make anywhere from one to four
boxes at a time. In power-tool woodworking, most of the work
is in the setup, so by making a few of one design, I can gain a
little economy of scale. Some processes though, especially
sanding and finishing, can become tedious when more than a few are
made, and I prefer to avoid work that feels anything like a factory.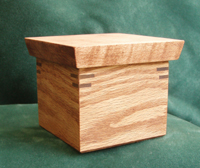
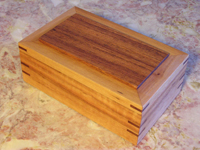
My first box is my take on one of Doug Stowe's designs. My
projects which use someone else's design are usually recognizable as
theirs, but I always change things; dimensions, wood species,
finish, or a combination of those. This small box is of red oak,
with mitered corners reinforced with poplar splines, a birch plywood
bottom, a small chamfer around the base and a maple top. I cut
these in such a way that the grain flows all the way around the box,
and then experimented with various stains and oil finishes
Next is a pair of keepsake boxes about ten inches long of walnut
and maple. The corners are 'lapped' and I altered the shapes of
the tops and bases to make them unique.
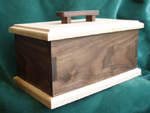 I shaped the pulls to mimic the curves of one and angles of the
other, and applied a natural rubbed Danish Oil finish (a blend of
oil and varnish) to both.
I shaped the pulls to mimic the curves of one and angles of the
other, and applied a natural rubbed Danish Oil finish (a blend of
oil and varnish) to both.
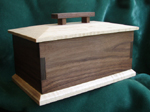 I love the look of oiled walnut and nothing could be easier to
apply; paint it on, wipe it off, and buff... for a beautiful satin
finish. The lift lids on
all of these boxes so far have a rabbeted edge that keeps the lids
centered on the box.
I love the look of oiled walnut and nothing could be easier to
apply; paint it on, wipe it off, and buff... for a beautiful satin
finish. The lift lids on
all of these boxes so far have a rabbeted edge that keeps the lids
centered on the box.
Next is an adaptation of a pencil box with a sliding lid. I
liked the look but I made it much bigger than you'd need for a
pencil box and made it of solid walnut. The trick with solid
wood boxes is to size the bottom and top with a loose fit to allow
for expansion and contraction due to changes in temperature and
humidity. I love the functional look of finger joints and I
make mine with a table saw jig that I also made
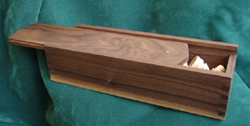 myself.
I cut these as well so that the grain would follow all the way
around. I particularly liked this one because of the lighter
sapwood border around the bottom. The brass pin on the lid
provides a stop to position the lid when it's closed and keep it
from sliding all the way off the box when opened. This one housed a
set of chess pieces until I gave it to my sister Katherine for her
birthday.
myself.
I cut these as well so that the grain would follow all the way
around. I particularly liked this one because of the lighter
sapwood border around the bottom. The brass pin on the lid
provides a stop to position the lid when it's closed and keep it
from sliding all the way off the box when opened. This one housed a
set of chess pieces until I gave it to my sister Katherine for her
birthday.
This next item isn't a box but it's small
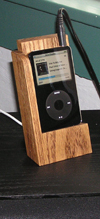 and
well made of wood and it's something I wanted for myself. I
have two iPods and use them to carry my music to various music
systems in our house and travel trailer. It's always bothered
me to lay them on a table or some other piece of furniture where I
couldn't see the monitor without picking them up. The
commercial docks are expensive for what they do and they look like a
mass produced piece of plastic. So I made this stand to
accommodate the downward exiting iPod
and
well made of wood and it's something I wanted for myself. I
have two iPods and use them to carry my music to various music
systems in our house and travel trailer. It's always bothered
me to lay them on a table or some other piece of furniture where I
couldn't see the monitor without picking them up. The
commercial docks are expensive for what they do and they look like a
mass produced piece of plastic. So I made this stand to
accommodate the downward exiting iPod
 power
cable and display my iPod in a more tasteful and functional manner.
I used oak that I reclaimed from a battered coffee table that I
bought with pocket change at a goodwill store, and beautiful old
vertical grained douglas fir that I recovered when I rebuilt our
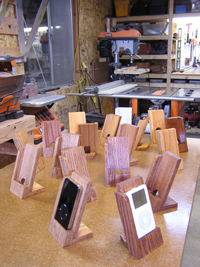
front porch. The stands are small so I made a bunch of them
with various differences in design, and finish. They will also
prop on their sides to use for iPhones and other small electronics.
If I sell my work, this would be a good candidate.
power
cable and display my iPod in a more tasteful and functional manner.
I used oak that I reclaimed from a battered coffee table that I
bought with pocket change at a goodwill store, and beautiful old
vertical grained douglas fir that I recovered when I rebuilt our
front porch. The stands are small so I made a bunch of them
with various differences in design, and finish. They will also
prop on their sides to use for iPhones and other small electronics.
If I sell my work, this would be a good candidate.
You can see a lot of my shop in this picture. From left to
right, planer, belt/spindle sander, drill press, table saw. My
router table isn't visible but it's pictured in my last newsletter.
I'm just beginning to appreciate the capabilities of this useful
tool. My bit collection is growing, but they are expensive!
Next, I sought a source of exotic hardwoods and found it in
Crosscut Hardwoods of Portland. What a find! And some of
the more common species cost little more than the red oak and
maple found at Home Depot. I can build several boxes out of a
single 1"x6" by six foot board. In two trips to Portland, I've
carried home samplings of Walnut, Bubinga, Ebony, White Oak,
Bloodwood, Ipe, Rosewood, Ash, White Oak, Purple Heart, Jatoba, and
Tiger Wood (not to be confused with the pro golfer).
My next project was a humidor design with an Asian flair from one
of my woodworking magazines. I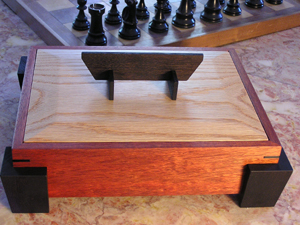 omitted the cedar liner and humidifying components and just made the
box. I used blood wood with mitered joints with ebony splines.
The lid and bottom are red oak and the legs and pull handle are
ebonized walnut. The stick of blood wood I started with was
terribly twisted and I did a lot of preliminary work just to prepare
the stock. But it's beautiful red wood with golden highlights
and worth the extra effort. To ebonize walnut, you combine rusty
iron with vinegar. Let it sit for a couple days and paint it
on. When the rusty vinegar combines with the tannin in the
walnut, it turns the walnut black almost immediately. When it
dries, it looks almost exactly like ebony, a much more expensive
wood ($87 a board foot for small pieces, to be exact). Nice trick. The vinegar raises the grain in the
walnut, but after a couple of sandings and re-applications, it's
ready to finish. The splines are real ebony. The box
pictured is finished with Danish Oil but I also did one with
shellac. Marilyn likes shiny things so I gave her the shellac
and one of the others to my friend Jim when he visited recently.
omitted the cedar liner and humidifying components and just made the
box. I used blood wood with mitered joints with ebony splines.
The lid and bottom are red oak and the legs and pull handle are
ebonized walnut. The stick of blood wood I started with was
terribly twisted and I did a lot of preliminary work just to prepare
the stock. But it's beautiful red wood with golden highlights
and worth the extra effort. To ebonize walnut, you combine rusty
iron with vinegar. Let it sit for a couple days and paint it
on. When the rusty vinegar combines with the tannin in the
walnut, it turns the walnut black almost immediately. When it
dries, it looks almost exactly like ebony, a much more expensive
wood ($87 a board foot for small pieces, to be exact). Nice trick. The vinegar raises the grain in the
walnut, but after a couple of sandings and re-applications, it's
ready to finish. The splines are real ebony. The box
pictured is finished with Danish Oil but I also did one with
shellac. Marilyn likes shiny things so I gave her the shellac
and one of the others to my friend Jim when he visited recently.
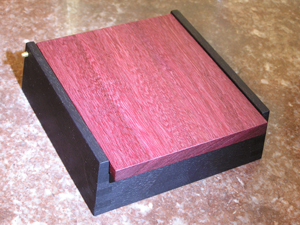
 This
next one is my own design and my personal favorite so far. I
call it a dresser box. The sides and bottom are tiger wood and
the top is jatoba with a tiger wood frame. The miter joints
are splined with jatoba keys. Everything worked well when I
built this box, but
This
next one is my own design and my personal favorite so far. I
call it a dresser box. The sides and bottom are tiger wood and
the top is jatoba with a tiger wood frame. The miter joints
are splined with jatoba keys. Everything worked well when I
built this box, but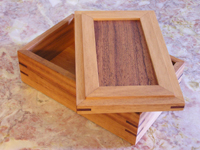 especially the tiger wood. It was very compliant wood to work
and the finish is down right 'buttery.' I especially like the complex shapes in
the lid of this box. Do I sound like I'm talking about wine? The space for wood movement is completely
hidden from view, inside and out.
especially the tiger wood. It was very compliant wood to work
and the finish is down right 'buttery.' I especially like the complex shapes in
the lid of this box. Do I sound like I'm talking about wine? The space for wood movement is completely
hidden from view, inside and out.
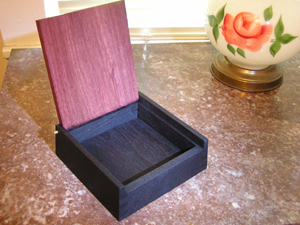
My next design is my first try at a hinged lid and my ideas
worked even better than I expected. Quality butt hinges are
expensive to buy and I don't particularly like the
 more
ordinary kind. I've seen boxes that use a brass pin for a
hinge so I decided to give that a try. I lucked into finding
some tubing with an inside diameter equal to my eighth inch brass
rod so I was able to make bearing sleeves for a more sophisticated
hinge mechanism. I like to see how things work so I
deliberately extended the hinge beyond the sides of the box. I
call this my 'bedside' box. The box is finger jointed and
ebonized walnut with tapered sides. The lid is a piece of
purple heart hardwood with the grain oriented front to back The
finish is my usual natural Danish Oil. I think the purple and
black has a sexy, bedside look to it. The grain orientation allowed
me to put the hinge pins across the grain for extra strength.
more
ordinary kind. I've seen boxes that use a brass pin for a
hinge so I decided to give that a try. I lucked into finding
some tubing with an inside diameter equal to my eighth inch brass
rod so I was able to make bearing sleeves for a more sophisticated
hinge mechanism. I like to see how things work so I
deliberately extended the hinge beyond the sides of the box. I
call this my 'bedside' box. The box is finger jointed and
ebonized walnut with tapered sides. The lid is a piece of
purple heart hardwood with the grain oriented front to back The
finish is my usual natural Danish Oil. I think the purple and
black has a sexy, bedside look to it. The grain orientation allowed
me to put the hinge pins across the grain for extra strength.
 Well,
I have more in the works but that's all I've finished so far.
As I mentioned above, I don't know if I'll wind up selling these or
just keep giving them away. I'd have to charge a LOT to
justify all the work I put into them, and then I wouldn't have as
many to show and give to people. Maybe I'll go ahead and
display them somewhere for sale but price them high so when
someone buys one, I'll feel better about letting it go.
Well,
I have more in the works but that's all I've finished so far.
As I mentioned above, I don't know if I'll wind up selling these or
just keep giving them away. I'd have to charge a LOT to
justify all the work I put into them, and then I wouldn't have as
many to show and give to people. Maybe I'll go ahead and
display them somewhere for sale but price them high so when
someone buys one, I'll feel better about letting it go.
I don't have a place for comments here but I'd still love to hear
from you if you care to share your thoughts. So if you're
inclined to comment, ask a question or just say "hi," please send me an
email. I love
to hear from old friends, new friends, fellow woodworkers and
travelers.
All the best,
Howard Replogle